Call 1-888-670-1652
Spire CoreDB Connect Error (2002) Connection timed out
How To Create Links
In the following section, you can find some guidelines on using links within your website.
The subsequent steps will differ depending on whether you wish to create an external or internal link. You can find more detailed instructions on how to create both of these types of links below. Note: Any links or email addresses written or pasted into the editor should always be live.
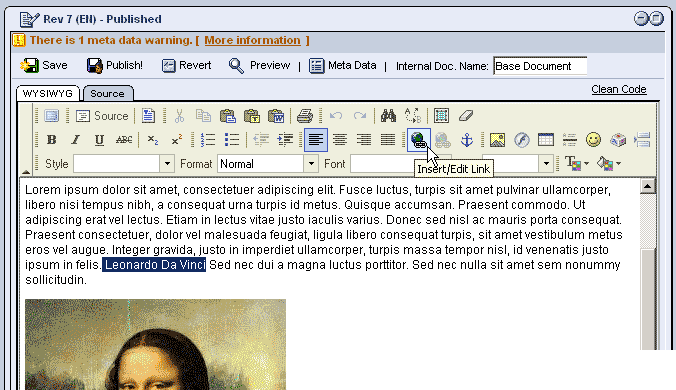
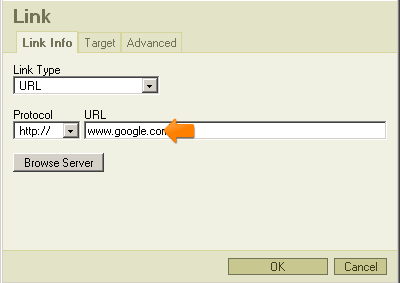
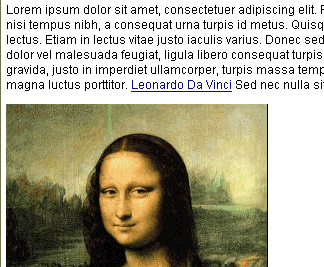
External Site Links:External site links are links that, when clicked on, transfer the user to other, external, sites that are not your own. One way to go about creating an external link is to, as previously mentioned, select a portion of text to act as the link and then click on the "Insert/Edit Link" icon. In the "Link" window that appears, simply ensure that "http://" is selected in the drop-down menu, and then type the full address of the desired website into the blank field labeled "URL." Click on the "OK" button, and the text initially selected will become blue and underlined,
indicating that it is now a link to the external site you have just specified.
To edit the link's properties, simply right-click on the link and, from the menu that appears, select "Edit Link." The "Link" window will be brought up, where you can alter various properties of the link. For instance, with external links, it is often helpful to set it so that when the link is clicked on, the external site will be launched in a new window. This can be done by selecting the "Target" tab in the "Link" window and then, from the drop-down menu, choosing "New window_blank."
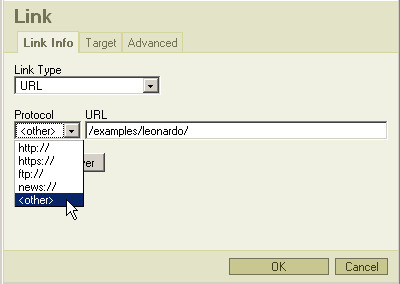
Internal Links:Internal links simply redirect the user to another page within your own website, and are created using a different process. After selecting the text to act as the link and clicking on the "Insert/Edit Link" icon, change the protocol specified in the drop-down menu from "http://" to "Other." Then, in the blank URL field, you can write the name of the particular page within your site that you wish to link to. Please note, however, that you may also have to include the folder path to the web page (e.g. /myfolder/myfile.htm). The easiest way to make an internal link is to make note of the File URL for the page you want to link to (e.g.
/examples/leonardo/) and then enter it as just described into the URL field of the "Link" window. However, if you wish, you can also type the full address of the web page (including your website's domain name) into the URL field (e.g.
http://www.yoursite.com/examples/leonardo/).
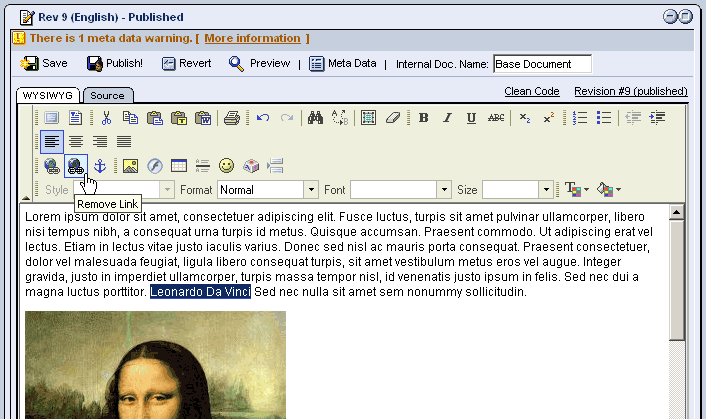
Removing Links:In order to remove links, whether external or internal, there are two options. One option is to highlight the piece of text acting as the link (which should be blue and underlined) and then right-click on it. From the menu which appears, simply select "Remove Link," and the link will be undone, as indicated by the text losing its blue color and underlining. The other option is to highlight the piece of text acting as the link and then simply click on the "Remove Link" icon located in the WYSIWYG editor toolbar (as pictured below).
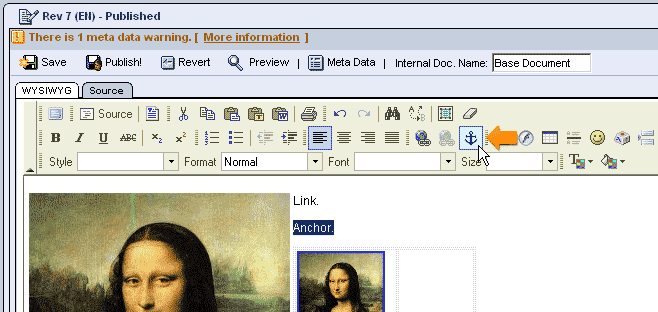
Anchors allow you to create quick links to particular sections of pages, so that users can find what they are looking for without having to scroll down and search through an entire page. Creating Anchors:In order to create one, simply highlight the portion of text that you wish to act as the anchor (the location users will be brought to upon clicking on the link). Once highlighted, click on the "Insert/Edit Anchor" icon in the WYSIWYG toolbar, which will cause an "Anchor Properties" window to appear.
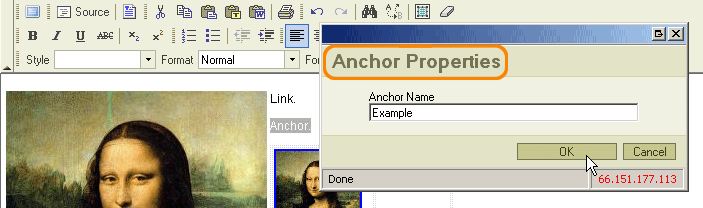
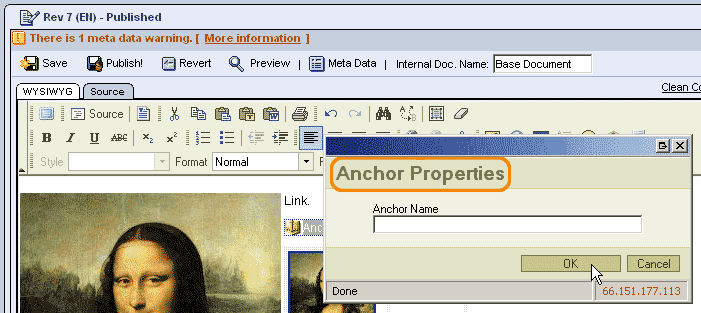
In the "Anchor Name" field of the window, simply type the name that you wish the anchor to be listed under, preferably something related to the section that the anchor will bring the user to.
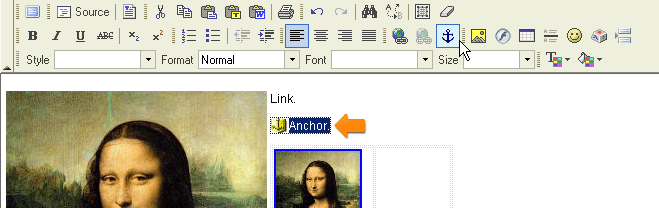
Once this is done, click "OK." There should now be an icon depicting an anchor next to the text you highlighted, meaning that it has successfully been made into an anchor.
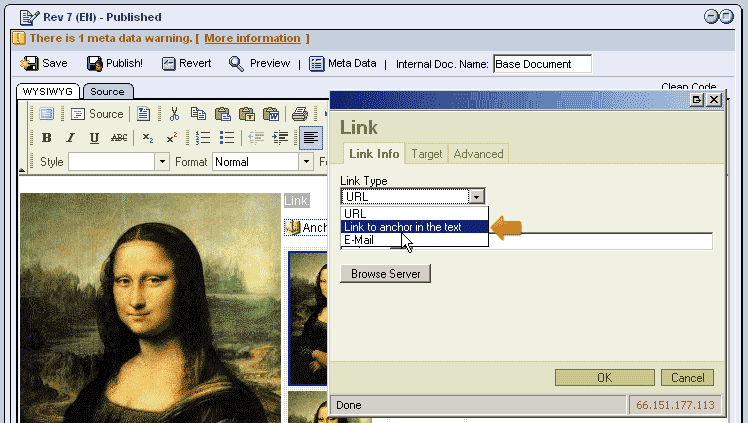
Simply select a piece of text that you wish to act as the link (usually located at the beginning of the page, perhaps in a list of the page's different sections or topics, all of which can be linked to with anchors) and highlight it with your mouse. Then, click on the "Insert/Edit Link" icon and, in the "Link" window that appears, select "Link to anchor in the text" from the drop-down menu labeled as "Link Type."
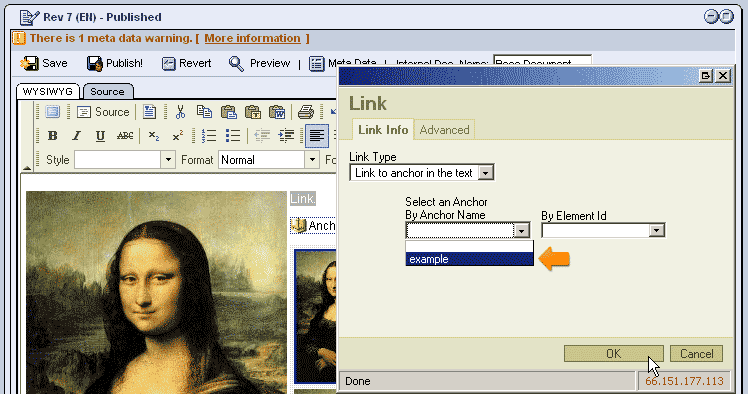
Once selected, you will be presented with another drop-down menu containing a list of all of the available anchors in the particular document. Select the desired anchor from the list and click "OK."
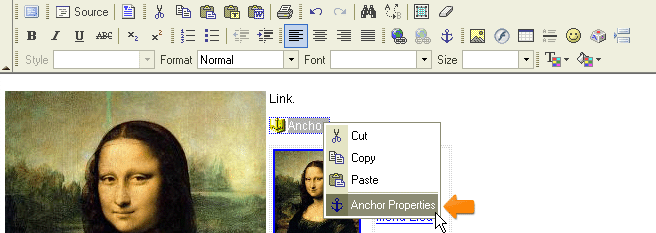
The text selected to act as the link should now be blue and underlined, and, when clicked on, will bring the user to the point on the page at which the anchor is located. Editing Anchors:In case you wish to alter a particular anchor, perhaps desiring to change its name, simply right click on the text acting as the anchor and select "Anchor Properties" from the menu which appears.
You can also access the "Anchor Properties" window in order to alter the anchor by highlighting the text acting as the anchor and then clicking on the "Insert/Edit Anchor" icon. Removing Anchors:In order to remove an anchor, access the "Anchor Properties" window in either of the two methods just described, and delete the anchor's name. Once deleted, click "OK," and the anchor icon will disappear from the selected text, indicating that the anchor no longer exists.
|
Aspiresoft 2017 © All Rights Reserved. Privacy Policy