Call 1-888-670-1652
Spire CoreDB Connect Error (2002) Connection timed out
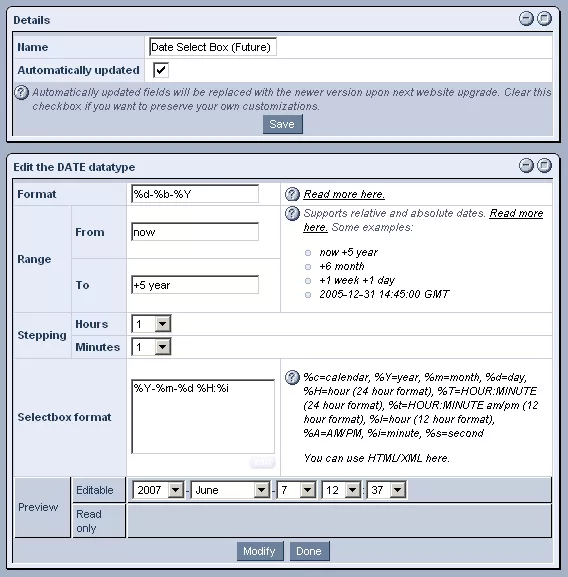
Date"Date" data types allow you to create fields in which users can select specific dates and times from customized drop-down menus. Creating Date Data Types:After selecting "fm: date" from the "Type" drop-down menu and entering an appropriate name for the data type, click "Save," and you will be presented with the "Edit the Date Datatype" window pictured below. Format: In the first field, labeled "Format," you can enter the format in which you would like the local time/date to be formatted, using the PHP strftime string. Range: The next two fields, collectively labeled "Range," allow you to specify the range of dates that you would like to be included in fields of this data type. In expressing the range of dates, you can use either relative or absolute dates. An example of using relative dates would be entering "now" into the "From" field" and "+5 year" into the "To" field. This would mean that in fields created with this data type, the dates available in the drop-down menus would range from the current date to five years from the current date. Alternatively, you could enter the absolute dates and times that you would like to serve as the first and last dates and times available, such as "2005-12-31 14:45:00 GMT" and "2010-12-31 14:45:00 GMT." Stepping: After you have specified the range, you can determine the intervals that will be used in the drop-down menus used to select hours and minutes. If, like in the picture below, you enter "1" for both "Hours" and "Minutes," you will have all hours (0-23) available in the "Hours" column of the field and all minutes (0-59) available in the "Minutes" column. If, however, you enter "6" for "Hours" and "15" for "Minutes," you will only have "0, 6, 12, 18" available in the "Hours" drop-down menu and "0, 15, 30, 45" in the "Minutes" drop-down menu. Selectbox Format: Once you have specified the "Stepping," you can go on to determine the "Selectbox Format." Here, you can use the codes provided on the right to specify how you would like the drop-down menus containing the available dates and times to be displayed in fields of this data type. Preview: Once you have entered all of the desired settings, click "Modify," and the "Preview" section at the bottom of the window will be updated to show you exactly what a field created with this data type will look like. As long as you are satisfied with the "Preview," click "Done" at the bottom of the screen, and the "date" data type will be added to the "List of Available Data Types." |
Aspiresoft 2017 © All Rights Reserved. Privacy Policy
