Call 1-888-670-1652
Spire CoreDB Connect Error (2002) Connection timed out
How To Find/Modify Company Information
In order to find a particular company's entry within the CRM system, click on the "Company" section of the CRM tab.
You will then be presented with a list of all companies stored in the CRM that contain the specified text in their names. Simply select the desired company from this list, and you can then begin to peruse and/or edit the company's information. Note: In order to further narrow your search, and locate the desired company more efficiently, we recommend filling in more fields with relevant information about the company you are looking for.
In addition to searching for individual companies, the system allows you to search for groups of companies that have something in common. In order to perform such a search, simply leave the "Company Name" field empty, and specify relevant criteria with the provided drop-down menus. For example, if you are looking for companies involved in online auditing, simply select "Online Audits" from the "Industry" drop-down menu and click "Search." You will then be presented with a list of companies meeting the specified criteria, from which you can select the desired companies in order to modify, delete, and/or simply view their entries.
In order to modify the information stored within the CRM on a particular company, you must first
locate the company's entry.
Locations & CommunicationsLocation: If you would like to add a new location to the company's profile, click on the
Simply enter the new location's details into the provided fields and click "Save."
When creating entries within the "Location" section (and the "Communications" section as well), you may notice a check-box labeled "Primary." You can feel free to enter as many different entries as you would like, but the one marked as "Primary" will be the one displayed on the company's page by default. Should you wish to modify this location, or any other existing location, simply select it from the drop-down menu labeled "Choose Location" and click on the
Location Communications: In this field you can modify communication entries that are attached to particular company locations. In order to add a new means of communication to a particular location, select the desired location from the "Choose Location" drop-down menu and click on the
In order to modify an existing communication entry, simply click on the
You can also remove a communication entry by simply clicking on the
Global Communications: In order to add an entry into the "Global Communications" section, just click on the
Corporate DetailsIn this tab, you will see 4 sections: Contact Types, Corporate Details, Corporate Datasheet, and Marketing Data. Contact Types: When adding the company to the CRM, you most likely already set a contact type. Should you wish to change it, however, just click on the
This section allows you to make changes to the company's nominal details. Simply enter the company's name and/or abbreviation as desired and click "Save."
In order to enter more specific information about a company, click on the
One field of particular interest may be the one labeled as "Industries." Here you will be able to view a tree of industries, which can be modified in the CRM administration to meet your particular needs. If you would like to specify an industry for the company, click on the "+" icon next to the appropriate folder and it will expand, allowing you to select a more specific industry classification for the company by checking the box next to the desired option. Once you have finished entering the relevant data, just click on "Save," and the company's profile will be updated.
With this field, you can specify the source through which the company in question was brought into contact with your business. Simply select the appropriate source from the drop-down menu, and the information collected can be used in the future to ensure more efficient and successful marketing.
EmployeesThis section allows you to view and modify a complete list of the company's employees. In order to add a new employee, simply click on the
For more information on how to complete the specific fields, please see our section on adding contacts. Should you wish to remove a particular contact from the list of employees, simply check the box located at the far right of that employee's row and click on the "Remove Selected" button located in the lower right-hand corner of the table. NotesThis section allows you to add relevant information, in the form of notes, to a company's CRM profile. In order to add a new note, click on the
If you would like to modify an existing note, this can be done here as well, by clicking on the
Should existing notes ever become irrelevant, redundant, or incorrect, there is also the option of removing notes from a company's profile. Just click on the
Credit CardsThis section allows you to store company credit card information with the secure storage system. In order to add a new credit card entry to the company's profile, click on the "Add" icon located in the upper right-hand corner and fill out the provided form with the credit card's information.
Should you wish to modify existing credit card information, click on the
As a note though, when editing existing credit card entries, you will not be able to view the entire credit card number, as everything except for the last four digits will be encrypted for security purposes. In order to view a credit card's full number, you must click on the "View" link in that credit card's row of the table. You will then be prompted by a pop-up window, where you can enter the password provided to you by our system administrator and click "Unlock."
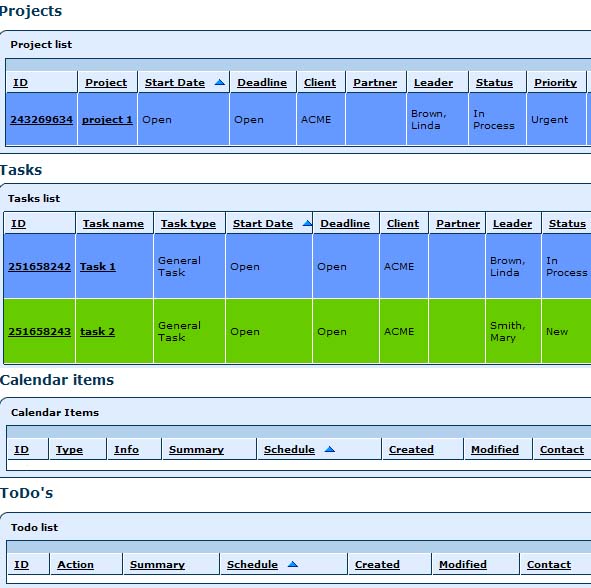
System PreferencesThis section allows you to set default settings and preferences for various functions in the PM module. With the provided fields, you can modify the company's billing group, set default notification settings for changes and additions to the company's profile, set default visibility settings for notes and files attached to the company's profile, as well as assign employees to act as concierges for the company. Project ManagementWithin the "Project Management" section, you can view lists of the company's projects, tasks, calendar items, and ToDo's consolidated in one convenient location. You can also add new projects, tasks, calendar items, and ToDo's for the company by clicking on the
Access DataThis section allows to record, view, and modify access data for various things, such as particular website domains, email, shipping gateways, and payment gateways. In order to create a new entry, click on the
In order to view existing access data, click on the
Access data entries can also be modified by clicking on the
Finally, should you wish to remove an access data entry, this can be done here as well. Simply click on the
|
 "Add" icon in the top right-hand corner of the tab.
 "Edit" icon. Then, in the provided form, modify the information as desired and click "Save."


Aspiresoft 2017 © All Rights Reserved. Privacy Policy