Call 1-888-670-1652
Spire CoreDB Connect Error (2002) Connection timed out
How to create simple FormFirst of all, login into your website administration. Create formAfter creating a form, in order to determine (or modify) its settings, you should click on the
From here, click on the form's "Settings" tab, where you can begin to customize the form by giving it a name.
Form Details:In order to assign a name to the form, simply click on the
Once clicked, you will be presented with a window like the one pictured below, in which you can enter the desired name and click "Save" in order to assign it to the form.
The next steps in creating a new form are to add fields and determine where submitted forms will be stored. For detailed instructions on how to proceed, please see the following sections: Create form fieldsAdd Common form fieldsIn order to maximize the efficiency and ease with which you create forms, you can make use of a number of pre-set commonly used fields that are stored within the system.
In order to add some of these common fields to your form, simply click on the
From here, you can take your pick of a wide variety of fields, such as "Name," "E-Mail," and "Upload File." In order to include them within your form, simply click within the "Add" box located in the desired field's row.
You can also specify if you would like the selected fields to be required and whether or not you would like the information entered into the fields to be displayed in the list of submitted forms by checking the appropriate boxes in the selected fields' rows. When you need other field as you see in predefinated list, create new form field by clicking 'Add custom field'. Add Custom form fieldsIn addition to the system's pre-set fields, you can include a variety of custom-made fields designed to fit the individual needs of your company and the form in question. Creating New Fields:In order to create a new field, simply click on the
In the window that appears, simply enter an appropriate name for the field (as you would like it to appear in the form) and select the type of field you would like to create from the drop-down menu listing all of the data types that have been added to the system.
In addition to specifying the field's name and type, you can determine if you would like the field to be required and whether or not it should be displayed in the listing of all submitted forms by checking the appropriate boxes.
Should you wish, you can also determine the field's visual settings by entering a desired width and height for the field, which will override any default visual settings specified in the form's overall template. Once you have finished outlining the field's details, just click "Save" at the bottom of the screen, and the field will be added to the "Form Fields" table. Special Cases With Data Types:
Pictured above is an example of using the "Short Text" data type to create a custom field (titled "Department Name") in which users can enter the name of the desired department, so long as the text does not exceed 250 characters (or whatever length was specified in the creation of the "Short Text" data type). Unlike the "Short Text" data type, however, some data types will need to be created each time you would like to use them in a form.
In case you can not find the right type for your purposes, you need to create new datatype (then it will display in pulldown menu of available Custom form types). Add DatatypeIn order to create a new data type, access the "Data Types" section of the XForms module, and click on the
In the window that appears, enter a unique name for the data type and then select the type of data that you would like to be entered into fields of this type from the drop-down menu.
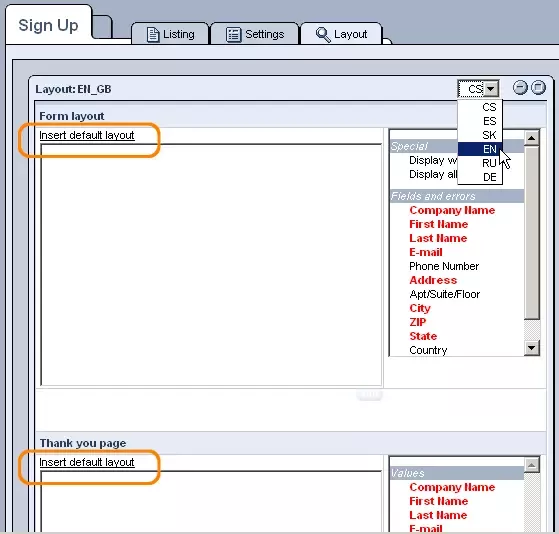
Depending on what type you select, you will then have to determine some more specific details. For more information on how to complete the details of the various kinds of data types, please see the following sections: Then you can add custom form field using just created datatype. Create form layoutIn determining the appearance of your form, you have the option of making use of the system's pre-set default layout. Form Layout:In order to apply the default layout to your form, you should first specify which language you would like to create the format for by selecting the desired option from the drop-down menu in the upper-right hand corner of the window (different layouts can be assigned to each of the individual languages that your site supports). Once you have selected a language to work with, simply click on the "Insert Default Layout" link at the top of the "Form Layout" screen, and HTML code will automatically be inserted into the window, making use of the fields and errors that your form contains, in order to determine the content and layout of the form. "Thank You" Page Layout:After setting the form's layout, you can move on to insert a layout for the "thank you" page, which will be displayed to users upon submitting your form. In order to do so, simply click on the "Insert Default Layout" link at the top of the "Thank You Page" window, and HTML code will automatically appear in the window, with variables for the fields within your form such as "First Name," which will be filled in with the details of the user in question each time the page is generated. Once layouts have been assigned to both the form and the "thank you" page, click "Save" at the bottom of the screen, and the settings will be applied to the system.
To create custom form layout see also Create Custom form layout page List and integrate dataThe "Listing" tab allows you to view a list of all the submissions made by users who have completed your form. The individual columns of data that appear in this table (such as "Company Name" and "Address") will depend on which fields you selected the "Display In Listing" option for when adding fields to your form. Should you wish to view the full details of a particular submission and/or modify some of the data, feel free to click on the
Should you wish for particular submissions to be disregarded, you will also have the option of marking them as junk. In order to do so, simply click on the
In addition to all of the features mentioned above, there is also the option of using a search filter to narrow down the list of submissions and of exporting submissions to a CSV file. For detailed instructions on how to go about using these two features, please see the section on the "Export" and "Filter" icons. Read more about XForm Data Integration Add form tag to the content of apropriate pageOpen content tab of the page you would like to display form at. Open text editor. There needs to be form tag here for displaying form. The tag is a System Tag and by clicking on 'System Tag' buttons you can select it from the pull down menu.
Then you need to type right id. You will find it in the XForm Administration in table listed all xforms:
Or just simply type this tag here.
|


Aspiresoft 2017 © All Rights Reserved. Privacy Policy