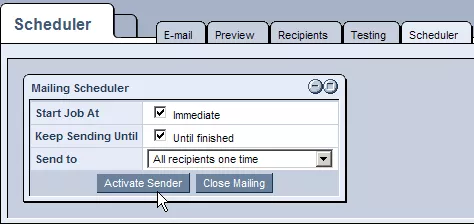
The "Scheduler" tab allows you to send the email to the list of recipients, once you have made sure that everything has been completed.
By default, the system will send the email immediately and continue sending until it has been delivered to all recipients, as indicated by the two checked boxes.
Scheduling Emails for a Later Date
If you would like to specify a different date and/or time for the system to begin sending your mailing, simply click on the "Immediate" box in order to deselect it, and choose the desired date and time from the drop-down menus that appear. If you would like to specify a different date and/or time for the system to stop sending your mailing, simply click on the "Until Finished" box in order to deselect it, and choose the desired date and time from the drop-down menus that appear.
Once the times have been set to your liking, select "All Recipients One Time" from the "Send To" drop-down menu in order to have the email sent once to each recipient within your list.
Resending Emails
Should you wish for the email to be sent to all recipients within your list, even if they have received the same mailing in the past, you should select "All Recipients Even if Sent Before" from the "Send To" menu.
Resending to Error Emails
Should you wish for the email only to be sent to those recipients for whom errors came up in the past when you were trying to send them your mailing, select "All Recipients With Errors" from the menu.
Activating Sender
Click on the "Activate Sender" button and the email will be sent in accordance with the specified guidelines.

In order to check the status of your mailing once you have completed the previous steps, simply return to the "Recipients" tab, where you can see whether or not the email was delivered successfully within the "Status" field of each recipient's row of the "Recipients List."
You can also check whether or not your emails have been opened by viewing the "Open" field within each recipient's row of the list.
And in case you included a link within your email, the "Clicked" field within each recipient's row of the list will display the number of times the link has been clicked on.
Finally, by viewing the "Removed" field within each recipients row of the list, you can determine if recipients have selected to remove themselves from your mailing list.
Please note, the best time to perform mass mailings is after 12 am and before 6 am eastern standard time.
Scheduler Statuses
Activate Sender
This button tells the system to start sending emails based on the current scheduling settings. After clicking this you will see a Stop Sender button and when the mailing is done, it will change to a Close Mailing button.
Close Mailing
This status will show up after all emails have been sent. If you want to add or send more emails with this mailing you will need to click the Close Mailing button and then click the Open Mailing Button.
By clicking on Close Mailing button, you are telling the system that this mailing is complete and to change the status to Closed
Open Mailing
This button will appear after a mailing has been closed. To re-open the mailing simply click on the Open Mailing button.
Stop Sender
This status shows up after you click on the Activate Sender button and will remain until all emails have been sent.