Call 1-888-670-1652
Spire CoreDB Connect Error (2002) Connection timed out
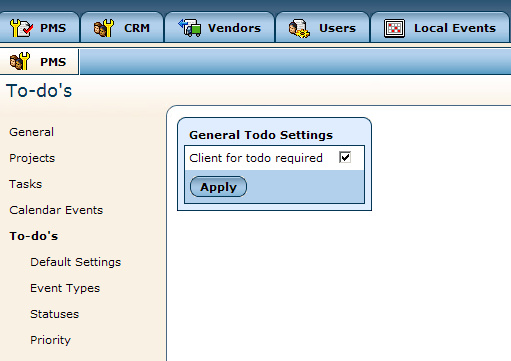
To-Do's SetupGeneral ToDo SettingsIn the field that appears when you click on the "To-Do's" section of the "Setup," labeled "General ToDo Settings," you can specify whether or not you would like to require all ToDo's to have a specified client. If you decide to check the box labeled "Client For ToDo Required," every time you create a new ToDo, you will be unable to save it until you select a client to whom it will be connected.
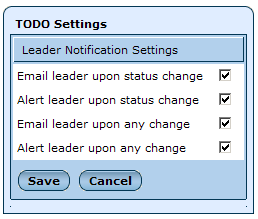
Default SettingsIn the "Default Settings" portion of the "To-Do's" setup section, you will see a window labeled "ToDo Settings," where you can specify default settings for notifications. Simply check the boxes next to the desired notification options, and, unless you specify otherwise when creating individual ToDo's, the settings specified here will be used to determine when leaders and assigned users are notified about specific changes to ToDo items.
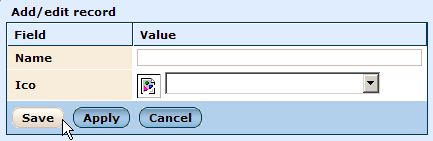
Event TypesIn this portion of the "To-Do's" setup, you can modify and manage the list of ToDo types. The "ToDo Types" window within this section allows you to view a complete list of the existing types which are available for classifying ToDo items. In order to add a new ToDo type to the list, simply click on the
Once this is done, click "Save" and the new ToDo type will be added to the system.
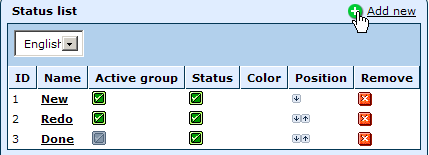
StatusesThis section allows you to to modify and manage the list of statuses used in classifying ToDo items.
You can add a new status option to the list by clicking on the
When presented with the status creation form, simply fill out the fields as follows:
Once you have completed the fields, click "Save" and the new status will be added to the system.
Should you wish to change the order in which the status options are displayed in their drop-down menu, simply use the arrow icons in the "Position" column to move individual options up or down within the list as desired. And should you want to remove a particular status option from the list entirely, simply click on the
PriorityThis portion allows you to modify and manage the list of priorities used in creating ToDo items !NEED SCREENSHOT Within the window labeled "Priority List," you will a list of the different priority options available for ToDo's. You can modify the settings for each priority by simply clicking on the desired option's name. Once you have selected the desired option to modify, you can changes its name, make it inactive by unchecking the "Enabled" box (so that it will not appear in the list of available priority options when creating ToDo's), and pick a color for events with that particular priority to be highlighted in. You can also change the order in which the priority options are displayed within their drop-down menu by using the arrow icons in the "Position" column to move individual options up or down within the list. And should you wish to remove a particular priority from the list entirely, simply click on the
In addition to modifying existing priority options, you can add new priorities to the list by clicking on the
Simply enter a name for the new priority, check the "Enabled" box if you would like the priority to become available and appear in the "Priority" drop-down menu for ToDo items, and select a color that you would like to be used to highlight ToDo's with this specific priority. Once you have completed the fields, click "Save" and the new priority will be added to the system. |
Aspiresoft 2017 © All Rights Reserved. Privacy Policy